The Brickman's Blog

Welcome to my Blog! PLEASE feel free to leave comments, or just say "hello"! If you'd like to include your name/nickname in your comments, simply click on "other"...but if you prefer to remain anonymous, that's OK too! CULINARY CONSULTING CODE: 10-10-2000

Tuesday, November 29, 2005

Basic Hollandaise Sauce

Hi everybody!

Well, November's almost over. Yikes. Before long, it'll be be Christmas all over again (where did the year go??).

I don't have that much to report this evening. For supper, I'm having a sandwich made from leftover corned beef, and some steamed asparagus (with Hollandaise sauce) on the side. I've prepared a small batch of my wasabi mayonnaise to dress the sandwich (the recipe for it is posted on the Blog...I think it was on November 12th. It's great on grilled tuna, but it works elsewhere, too!).

Hollandaise Sauce is a traditional egg-thickened sauce (as opposed to thickening with flour, a cornstarch slurry, a roux, etc. or by reduction). It's not that hard to make, and the home-made variety is MUCH better than the stuff that comes in a jar (or, heaven forbid, in powder form). It's just important to keep a very close eye on things.


Hollandaise Sauce (2 servings; recipe can be multiplied)

(the hardware: you'll need a small saucepan, and a heavy, stainless steel bowl that's wider than the saucepan. The bowl should have a rounded bottom, preferably. And you'll need a whisk)

*2 eggs

*1/2 cup unsalted butter, refrigerated (so it's still firm)

*2 teaspoons lemon juice

*(up to) 1 Tablespoon light cream, heavy cream, or half & half

*a few dashes (about 1/4 to 1/2 teaspoon) Tabasco, or other hot sauce (optional)

* a few crushed/broken ice cubes

*salt, freshly-ground black pepper, and (optional) cayenne pepper, to taste

Start by creating a double-boiler: fill a small saucepan (1.5- or 2-quart) about 1/3 full of water. Put the pan on the stove, over high heat, and allow the water to come to a boil.

Meanwhile, separate the eggs; discard the whites (or save them for some other use...it's up to you). Place the raw yolks into the stainless steel bowl. Add the lemon juice, give everything a quick stir, and set aside until the water is boiling.

In the meantime, cut the butter into small chunks. It doesn't have to be scientific; just so you can add it a little at a time.

When the water boils, it's time to act quickly. Reduce the heat somewhat...down to medium high (you may have to adjust). The idea is to keep the water simmering while you're heating the sauce. Place the bowl with the eggs yolks into the saucepan of water, and proceed to whisk the egg yolk mixture vigorously. You might wish to use an oven mitt, or a towel, to hold the bowl. As soon as the egg yolk mixture takes on a creamy, consistent texture, add a small "chunk" or two of the butter. CONTINUE WHISKING as the butter melts, and becomes incorporated.

It will be necessary to lift the bowl from the saucepan, occasionally, to moderate the heat. But KEEP ON WHISKING! Gradually add the remaining butter, bit by bit, until it has all been incorporated. If you keep "moderating" the temperature---removing the bowl from the heat, then returning it---there should be no problems.

However, if the sauce gets too thick (this is a bad thing), quickly throw in a small chunk of ice (and KEEP WHISKING!). The additional liquid, combined with the slight reduction in temperature, should make the sauce "workable" again.*

When the butter has all been incorporated, turn off the heat under the saucepan. Add enough cream (just a little) to thin the sauce to a consistency you like. A teaspoon or two should be plenty. Season the sauce with salt, pepper, Tabasco, and/or cayenne, to suit your taste (and KEEP WHISKING!).

Serve immediately over asparagus, or whatever cooked vegetable you like. Or, pour some over poached eggs (that's Eggs Benedict!).

(*in the event that your sauce "breaks", or curdles: it's not the end of the world! Simply pour the "broken" sauce into another bowl, and set aside. Wash and thoroughly dry the stainless steel bowl, then separate another 2 eggs. Place the 2 new egg yolks into the stainless steel bowl, and heat them over the double boiler...WHISKING CONSTANTLY, as always. When the egg yolks become creamy, whisk in the original sauce. This ought to smooth the mixture. Be sure to check for seasonings)

Really, it's not as difficult as it sounds!

I hope you enjoy!

Friday, November 25, 2005

Let's Order Delivery for Dinner


I ran across this picture, and I just HAD to share it. Since my restaurant's business is primarily delivering food, I thought this was hilarious!

Saturday, November 12, 2005

Grilled Tuna with Wasabi Mayonnaise

Hello everybody!

I was given this recipe by a friend. I modified things, just a little, to make the recipe "grill-friendly". Originally, the tuna was pan-seared...and if you like, you can still do it that way (sorry, you're going to miss the grill marks!).

Grilled Tuna with Wasabi Mayonnaise (serves 2)

(the sauce)

1 tsp wasabi powder
1 tsp water
1 TBS rice vinegar (cider vinegar or white vinegar will do, in a pinch)
2 TBS mayonnaise
1 clove fresh garlic, minced
about 4-5 drops pepper-flavored sesame oil (optional)

(the tuna dressing)

2 yellowfin tuna steaks, about 1/2-pound each
1 TBS soy sauce
1 TBS vegetable oil
1/2 tsp wasabi powder
another 4-5 drops pepper-flavored sesame oil (optional)

(To make the sauce)

In a small bowl, mix the wasabi powder with the water. Make sure to mix thoroughly, to form a thin paste. In a larger bowl, mix the remaining sauce ingredients, then add the wasabi/water paste. When everything's incorporated, cover the bowl with plastic wrap, and refrigerate. Allow 30 minutes or so for the flavors to blend. After about 30 minutes, light up your grill.

(To make the tuna steaks)

In a small bowl, combine all tuna dressing ingredients (except for the tuna itself). Brush the prepared dressing liberally onto both sides of each tuna steak.

Put the steaks onto a hot grill (medium-low to medium heat), and allow them to took on one side for at least 3 minutes. After 3 minutes, flip the steaks and cook for another 2 minutes. Check for doneness by gently pulling apart the tuna with a fork; it should appear deep red in the center, and a pale beige toward the outside. If the tuna steaks are of high quality, I recommend leaving them a little rare on the inside. If you prefer yours well-done, then allow up to one or two additional minutes. But please don't allow the tuna to dry out!

When done, plate the tuna steaks, and drizzle each one with the wasabi mayonnaise. Serve with a green salad, or some other light fare such as steamed vegetables. Oh, boy...good stuff!

This recipe can be multiplied easily.

Hope you enjoy!

Wednesday, November 09, 2005

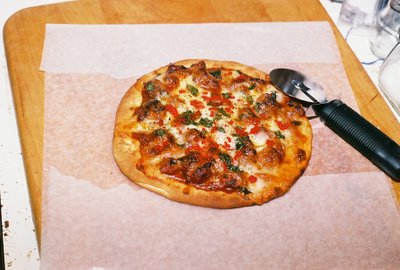
Picture-Perfect Pizza

Thursday, November 03, 2005

Pineapple-Apple Pie

Hi again everybody!

As promised, I'm back with a tremendous recipe for Pineapple-Apple Pie. It's really not at all hard to do, and the results are absolutely delicious. I used a couple of those store-bought, pre-made pie crusts (the kind you just unroll), but if you've got the time, patience and counter space to make dough from scratch, then by all means do so!

Pineapple-Apple Pie

(the pie filling)

1 20-ounce can of pineapple chunks or crushed pineapple (in juice)

3/4 cup white sugar

3 TBS cornstarch

2 TBS whiskey (I used Jim Beam...use whatever you got!)

1 TBS fresh-grated ginger

1 TBS lemon juice

2 9-inch pie crusts (one for the pan, and one for the top)

egg wash (consisting of 1 egg, 1 TBS water, and 1 TBS milk, all whisked together)**

(the apple layer)

about 2 medium-sized Granny Smith apples, peeled, cored and sliced into thin wedges

2 TBS dark brown sugar

1 TBS white sugar

1/2 tsp fresh ground cinnamon

1/4 tsp grated nutmeg

Reserve 3 TBS of the juice from the canned pineapple. Put the rest of the contents of the can into a saucepan, along with the 3/4 cup sugar, the ginger, the whiskey, and the lemon juice. Allow the mixture to come to a gentle boil, over medium heat.

Meanwhile, mix the cornstarch with the reserved 3 TBS of pineapple juice. Using a fork, whisk this mixture VERY thoroughly, otherwise there will be lumps in your pie filling.

When the contents of the saucepan have reduced by about 25 percent (it doesn't have to be exact), whisk the cornstarch/juice mixture one more time, then immediately pour it into the saucepan. Use a wooden spoon, and stir it constantly (be gentle---you don't want to crush up the pineapple too much). Allow it to boil gently for 1-2 minutes. During this time, it will become extremely thick. After it's thickened, remove from heat...no need to cover it. It's best to allow it to cool for a little while, anyway.

Preheat oven to 425 degrees.

Combine the brown sugar, 1 TBS white sugar, cinnamon and nutmeg in a zipper-type plastic bag (the gallon-size ones work perfectly). Throw in the sliced apples, and shake the bag thoroughly, to coat the apple pieces with the sugar mixture.

Press one of the pie crusts into a 9-inch pie pan. Using a fork, gently poke a few holes all over the bottom of the crust (be careful not to puncture the pan!). Place this empty crust into the 425-degree oven, and "blind-bake" (partially cook the crust) for about 5-10 minutes. When parts of the bottom of the crust begin to form bubbles, it's time to take it out of the oven. Remove the partially-baked crust (use an oven mitt...it's going to be hot!) from the oven, and use that same fork to gently pop any small bubbles. You want the bottom of the crust to be flat.

Arrange the coated, sliced apples all around the inside of the pie crust, making up to two layers (around 1/2-inch deep). Then, use a large spoon to scoop the pineapple filling into the crust (it will probably be too thick to pour easily). Use the bottom of the spoon to even-out the top of the filling.

Brush the egg-wash all around the top edge of the bottom crust. If you don't have a pastry brush, you can use a BRAND NEW paint brush (just be sure you've never painted with it!). The egg-wash will act as an adhesive for the top crust.

At this point, you may either cut the remaining pie crust (using a pastry wheel, or a pizza cutter) into strips, and arrange it on top of the pie as a "lattice" crust; OR you can simply flop the entire, uncut crust onto the base. If you use the top crust "whole", just be sure to make a few small slits in it to allow steam to escape.

Using your fingers, crimp the top crust to the bottom crust, so they're well-joined. It doesn't have to be pretty...the looks of the pie will change as it cooks, anyway. Use a kitchen scissor, or a small, sharp knife, to trim off any excess pieces of the top crust.

Put the whole pie onto a cookie sheet (it makes things easier to clean up, if the pie happens to boil over), and bake it in the 425-degree oven for about 25 minutes. After 25 minutes open up the oven and take a look. The top and edges of the crust should be a nice, even golden-brown. If it doesn't look that way yet, close the oven door and give it 10 more minutes.

When done, remove the pie (still on the cookie sheet), and place it on a rack to cool. The pie should be either at room-temperature, or refrigerated, for serving.

Just a hint: a scoop (or two) of ice cream plopped onto a slice of this stuff....whoa, baby!

(** a word about egg-wash: this is a standard formula for egg-wash. It may or may not contain milk or cream, but it will always contain egg, and usually a bit of water. It's primarily a "glue" that holds things together...it helps pie crusts stay together, and it adheres coatings to foods that are going to be deep-fried. It also adds a nice, golden shine to foods, like Challah and other breads. Also, it adds a bit of egg flavor and a slight chewiness to things. Problem is, you're going to have WAY more egg-wash than you need...there's no way to use HALF an egg. So, expect a bit to be left over. Or better still: make two pies!)

Wednesday, November 02, 2005

Grilled Flank Steak

Much as I hate to admit it...Summer's over, folks.

Not that I'd ever let that stop me from grilling; as long as I can SEE the grill, I can use it. The grill (or the smoker, for that matter) doesn't care what the outside temperature is. But I've begun preparing alot more "in-house" stuff lately, as well.

This is a very easy recipe for Grilled Flank Steak. It doesn't take much time, or effort, and the results are absolutely delicious. A little later, I'll post a recipe for Pineapple-Apple Pie. It, too, is simple, and the results are great!

Grilled Flank Steak

1 flank steak, about 1-1/2 to 2 pounds

1/2 cup soy sauce

1/2 cup whiskey (I used Jim Beam)

1/4 cup lime juice

1-1/2 teaspoons (about 2 cloves) minced fresh garlic

about 10 whole peppercorns

3 or 4 large bay leaves, crushed

1/2 teaspoon smoke flavoring (optional)

Combine all the ingredients, except for the flank steak, in a bowl. Mix until everything's well-incorporated.

Place the flank steak into a gallon-size "zipper" bag. Pour the marinate mixture into the bag, and zip it shut.

Store the bagged steak (use a shallow container, or a roasting pan, in case the bag leaks) in the refrigerator for anywhere from 2 to 4 hours.

After marinating, remove the steak and discard the marinate. If necessary, the steak may be quickly rinsed under cool, running water, to remove any large "bits" of the marinate. Put the flank steak on a large plate or platter, and cover with plastic wrap. Allow the steak to rest in a safe place (like a cool oven) for at least 30 minutes, so it'll come to room temperature. In the meantime, fire up the grill.

After thirty minutes (or longer; there's no rush at this point), grill the flank steak over medium (NOT TOO HOT!) heat, for about 4 minutes. After 4 minutes, flip the steak, and grill for another 4 minutes.

At this point, you'll have to determine just how "done" the flank steak is. There's no way to insert a thermometer into a flank steak, so you'll have to use the Touch Method. Simply put, the Touch Method involves pushing against a piece of meat with the tip of your finger. Depending on the texture/resilience of the meat, you can tell the degree of doneness (yes, it does require a little practice. Remember, you can always throw the meat back onto the grill, if necessary, so it's best to err on the side of too rare, rather than too well-done).

If you press against a flank steak, and your finger leaves a dent (in other words, it doesn't spring back), the steak is very rare. If you press the steak and the meat gives easily, but springs back quickly, it's probably rare-to-medium-rare. This is the ideal degree of doneness for a flank steak.

Remove the steak from the grill, and place it on a platter. Alllow the meat to rest for about 15-20 minutes before carving. Always slice a flank steak (and most other of the "tough" cuts of meat) at a 90-degree angle to the grain; this helps to further break down the tough fibers, resulting in a very tender, delicious dish.

Serve alongside traditional "picnic fare", such as potato salad, baked beans, or whatever you like. The leftover flank steak (sliced super-thin) also makes an excellent addition to a chef's salad!